Hello tech enthusiasts! Welcome back to jasta, your go-to destination for all things tech. Today, we’re diving into how to write unit tests in Java with JUnit 5, providing a step-by-step guide to help you accomplish this on your computer. Whether you’re a seasoned tech guru or just starting your digital journey, our straightforward instructions will make the process a breeze. Let’s jump in and start writing unit tests in Java with JUnit 5.
Table of Contents
Why You Should Implement Unit Tests for Your Java Application
In modern software development, unit testing stands as an indispensable pillar of ensuring code quality and reliability. At its core, unit testing involves the systematic validation of individual units or components of a software application, typically at the function or method level. The primary goal? To verify that each unit behaves exactly as intended under various conditions, effectively contributing to the overall functionality of the system.
Writing unit tests in Java with JUnit 5 offers a structured approach to this crucial aspect of software engineering. By meticulously crafting tests to assess the behavior of isolated code units, developers gain invaluable insights into the correctness and robustness of their implementations. But why is unit testing so vital, especially in the context of Java development with JUnit 5?
First and foremost, unit testing serves as an early warning system, flagging potential bugs and errors in the codebase long before they manifest into critical issues in a production environment. By identifying and rectifying these issues early in the development lifecycle, developers can significantly reduce the time and effort spent on debugging and troubleshooting later stages.
Moreover, unit testing fosters a culture of confidence and trust in the codebase. Each passing test provides a tangible affirmation that a particular piece of functionality works as expected, instilling a sense of assurance among developers and stakeholders alike. This confidence translates into smoother integration processes, as developers can confidently integrate their changes knowing that existing functionality remains intact.
Furthermore, writing unit tests in Java with JUnit 5 facilitates seamless code maintenance and refactoring. As software projects evolve over time, developers often need to make changes to existing code to accommodate new requirements or optimize performance. Unit tests act as a safety net, ensuring that modifications do not inadvertently introduce regressions or break existing functionality.
In summary, unit testing with JUnit 5 is not merely a best practice; it’s a fundamental aspect of modern software development. By validating individual units of code in isolation, developers can uncover defects early, build confidence in their codebase, and facilitate seamless maintenance and evolution of software projects.
Most Important Annotations for JUnit 5 tests in Java
In JUnit 5, annotations play an important role in defining the behavior and structure of unit tests. Understanding and effectively utilizing these annotations is essential for writing clear, concise, and maintainable test code. Below, are some important annotations that are necessary for writing unit tests in Java with JUnit 5.
@Test
This annotation is used to mark a method as a test method. JUnit 5 will execute all methods annotated with @Test.
@BeforeEach
Methods annotated with @BeforeEach are executed before each test method in the class. They are typically used to set up common test fixtures or initialize resources.
@AfterEach
Methods annotated with @AfterEach are executed after each test method in the class. They are commonly used to clean up resources or reset the state after each test.
@BeforeAll
Methods annotated with @BeforeAll are executed once before all test methods in the class. They are used for setup operations that are performed once for the entire test class.
@AfterAll
Methods annotated with @AfterAll are executed once after all test methods in the class have been executed. They are typically used for cleanup operations that need to be performed once after all tests have finished.
@Disabled
Methods annotated with @Disabled are skipped during test execution. This annotation is useful for temporarily excluding tests that are not ready or relevant
@ExtendWith
Used to register extensions with JUnit 5 tests, @ExtendWith allows you to customize the behavior of test classes or methods by applying additional functionality provided by extensions.
Step-by-Step Guide to Writing Unit Tests in Java with JUnit 5
In this tutorial, we are writing unit tests in Java with JUnit 5 for our FileHelper from the reading and writing to files in Java tutorials. You can find the full code of the FileHelper class here on our GitHub repository.
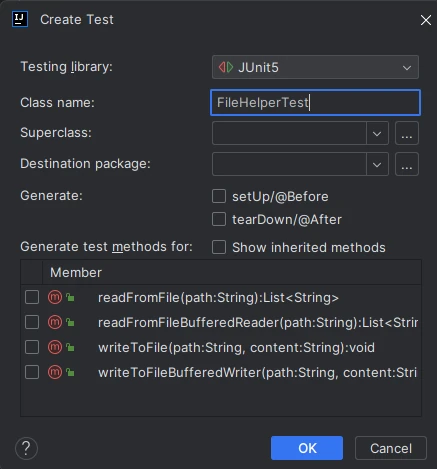
To start, we must create a class that will later contain all the tests. This can be automatically done. For that, you need to open the class which should be tested and press CTRL+SHIFT+T on your keyboard. Now a small menu will appear where you can click on create new test. Then a configuration window is going to show on your screen. With that configurator, you can choose the JUnit version, the class name, a superclass, and the destination package and you can even auto-generate the setup and teardown methods and create test methods for the methods inside the class.
For this tutorial, we are just choosing the correct version and the class name. The rest will be left empty.
For our FileHelper we want to test both read and write methods. All of the methods have a Path as a method parameter so we first need to create a file within a directory that can be used for testing. To not have to worry about deleting the directory after all the tests, we are using the @TempDir annotation. This will generate a temporary directory when starting the tests. After all the tests run through, the directory will be deleted automatically. Without this annotation it would be necessary, to create the directory in the @BeforeAll method and delete it in the @AfterAll method.
In addition to the directory that will contain the file, we are also declaring a file name, the file for the tests itself and the file content in the test class.
  @TempDir
  private File tempDir;
  private final String fileName = "tempFile.txt";
  private File tempFile = new File(tempDir, fileName);;
  private final List<String> testContent = List.of("Hello World!", "This is a test.");
After declaring every necessary variable in the class we are creating the @BeforeEach and @AfterEach method. In these methods, we are going to create/delete the file that will be used for the tests.
  @BeforeEach
  void setUp() throws IOException {
    tempFile.createNewFile();
  }

  @AfterEach
  void tearDown() {
    tempFile.delete();
  }
Now we are going to test our methods of the FileWriter class. Since the FileWriter class has read and write methods implemented with java.nio and java.io, we are going to test these in two different tests.
To create a unit test you need to write a method that does something to begin with. In this case, this would be FileHelper.writeToFile and FileHelper.readFromFile. To make this method a test you need to add a @Test annotation above the method declaration. Now the method is already a valid test which calls a method but doesn’t check if the method is actually working. Therefore we are adding an assertEquals call which will check if the file content written and then read by our FileHelper has the same amount of lines. Furthermore, we are iterating through the read results and checking if it is equal to the content we wanted to write with the FileHelper.
If all these assertions are correct, we know that the writing and reading of files is working correctly. The same checks are also done in the test method for the java.io FileWriter methods.
  @Test
  void testFileWriter() {
    FileHelper.writeToFile(tempFile.getAbsolutePath(), String.join("\n", testContent));
    List<String> fileContent = FileHelper.readFromFile(tempFile.getAbsolutePath());

    assertEquals(testContent.size(), fileContent.size());

    for (int i = 0; i < testContent.size(); i++) {
      assertEquals(testContent.get(i), fileContent.get(i));
    }
  }

  @Test
  void testBufferedFileWriter() {
    FileHelper.writeToFileBufferedWriter(tempFile.getAbsolutePath(),
        String.join("\n", testContent));
    List<String> fileContent = FileHelper.readFromFileBufferedReader(tempFile.getAbsolutePath());

    assertEquals(testContent.size(), fileContent.size());

    for (int i = 0; i < testContent.size(); i++) {
      assertEquals(testContent.get(i), fileContent.get(i));
    }
  }
To prevent code duplications, the checks can also be done in a separate method which is called by a test method. The code would then look like this:
  @Test
  void testFileWriter() {
    FileHelper.writeToFile(tempFile.getAbsolutePath(), String.join("\n", testContent));
    checkReadResult(FileHelper.readFromFile(tempFile.getAbsolutePath()));
  }

  @Test
  void testBufferedFileWriter() {
    FileHelper.writeToFileBufferedWriter(tempFile.getAbsolutePath(),
        String.join("\n", testContent));
    checkReadResult(FileHelper.readFromFileBufferedReader(tempFile.getAbsolutePath()));
  }

  private void checkReadResult(List<String> actualContent) {
    assertEquals(testContent.size(), actualContent.size());

    for (int i = 0; i < testContent.size(); i++) {
      assertEquals(testContent.get(i), actualContent.get(i));
    }
  }
It’s also possible to assert Exceptions to test invalid parameters given to the FileHelper. Instead of assertEquals you can use assertThrows with the expected exception class, an executable code and you can also add an error message to all of your assertions. It is also possible to check the exception message because assertThrows returns the occurred exception.
  @Test
  void readFromFileError() {
    RuntimeException e = assertThrows(RuntimeException.class,
        () -> FileHelper.readFromFile(tempDir.getAbsolutePath()),
        "Exception was not thrown!");

    assertEquals(e.getCause().getMessage(), "The file cannot be accessed!");
  }

  @Test
  void readFromFileBufferedReaderError() {
    assertThrows(RuntimeException.class,
        () -> FileHelper.readFromFileBufferedReader(tempDir.getAbsolutePath()),
        "Exception was not thrown!");
  }
Your full test class should now be the same as the code below. You can also find the complete code here.
import static org.junit.jupiter.api.Assertions.*;

import java.io.File;
import java.io.IOException;
import java.util.List;
import org.junit.jupiter.api.AfterEach;
import org.junit.jupiter.api.BeforeEach;
import org.junit.jupiter.api.Test;
import org.junit.jupiter.api.io.TempDir;

class FileHelperTest {

  @TempDir
  private File tempDir;
  private final String fileName = "tempFile.txt";
  private File tempFile = new File(tempDir, fileName);;
  private final List<String> testContent = List.of("Hello World!", "This is a test.");

  @BeforeEach
  void setUp() throws IOException {
    tempFile.createNewFile();
  }

  @AfterEach
  void tearDown() {
    tempFile.delete();
  }

  @Test
  void testFileWriter() {
    FileHelper.writeToFile(tempFile.getAbsolutePath(), String.join("\n", testContent));
    checkReadResult(FileHelper.readFromFile(tempFile.getAbsolutePath()));
  }

  @Test
  void testBufferedFileWriter() {
    FileHelper.writeToFileBufferedWriter(tempFile.getAbsolutePath(),
        String.join("\n", testContent));
    checkReadResult(FileHelper.readFromFileBufferedReader(tempFile.getAbsolutePath()));
  }

  private void checkReadResult(List<String> actualContent) {
    assertEquals(testContent.size(), actualContent.size());

    for (int i = 0; i < testContent.size(); i++) {
      assertEquals(testContent.get(i), actualContent.get(i));
    }
  }

  @Test
  void readFromFileError() {
    RuntimeException e = assertThrows(RuntimeException.class,
        () -> FileHelper.readFromFile(tempDir.getAbsolutePath()),
        "Exception was not thrown!");

    assertEquals(e.getCause().getMessage(), "The file cannot be accessed!");
  }

  @Test
  void readFromFileBufferedReaderError() {
    assertThrows(RuntimeException.class,
        () -> FileHelper.readFromFileBufferedReader(tempDir.getAbsolutePath()),
        "Exception was not thrown!");
  }
}
Now that your test class is ready, you can execute the whole test class with all the tests with the green arrow next to the class name inside the code or just run a single test method with the green arrow next to the method declaration.
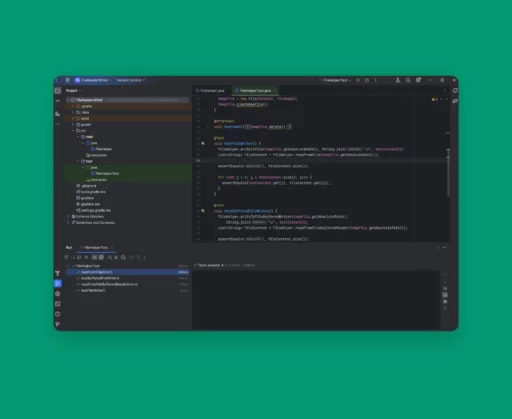
When the tests are finished you will see the result of them in the run window at the bottom of your IDE as shown in the screenshot below.

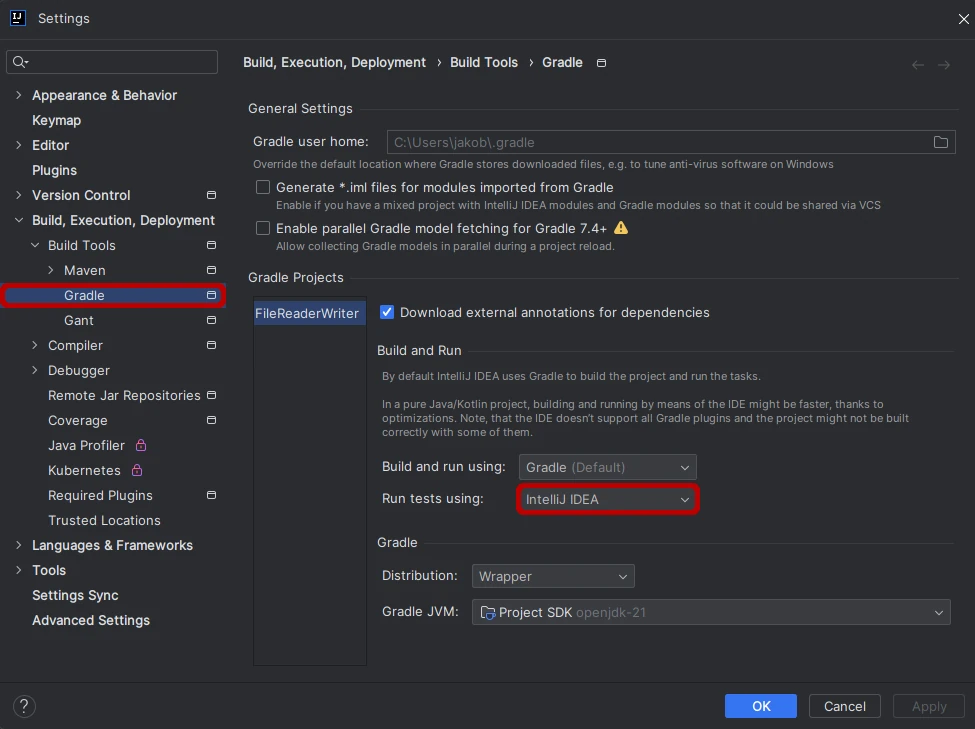
If you don’t see each test method result but only the test class, you have to switch from running unit tests with Gradle to running them with IntelliJ IDEA. To do this you first have to open the settings of IntelliJ. This can be done with CTRL+ALT+S or via the top menu under ‘File’. After opening the settings window, you need to find ‘Build, Execution, Deployment’ on the left side, expand it, find Build Tools and click on Gradle. In the window after clicking on Gradle you can now set ‘Run tests using:. Choose IntelliJ IDEA from the drop-down menu and click OK.
If you now run your unit tests you will see every single test listed on the run window.
If a unit test fails you will also be able to see the difference in the result window, so you don’t have to debug into the test to see what values are getting compared or checked.

As we wrap up our journey through the process of writing unit tests in Java with JUnit 5, I hope you’ve found this guide insightful and helpful in enhancing your knowledge. Should you encounter any questions or challenges while implementing, don’t hesitate to reach out. Your feedback, queries, and insights are always valued, and I’m here to assist you on your coding adventures. Until next time, happy coding!


